
The tying diagram Ashley gives for ABOK #2217 has a 4-fold axis of symmetry:

Tying a knot according to a diagram like this is quite time consuming. One must redraw the diagram by photocopying to the size needed. And in tying the knot, one pins the rope to the diagram. This is a pain because the rope moves around, the pins come out, etc. And the pins can damage the appearance of the rope.
In this post I give an alternative method of tying this knot, and several others like it, that is easier to set up, is much faster for each knot, and uses cheaper materials. Rather than an expensive cork board, we will use a 2×2 and build the knot as if it were a sort of Turk’s Head knot, on a cylindrical of square form.
First, to show that this method of tying the knot gives an identical knot, observe that the following diagram gives the same pattern of numbers as the Ashley diagram:

These drawings are how one converts a path in a 2-manifold into an over/under knot. This knot has 40 crossings (or 41, as the bitter end is hidden). Following the path of the rope, every other crossing will be an “under.” Beginning with the start point, label the under crossings in sequence. Along the way, you will also visit all the “over” crossings. If there is already a number there, then great, at that point in making the knot you will be laying rope on top of rope. But if there is no number yet there, then the “under” rope is not yet placed. This means that when you do get around to that crossing, you will have to dig under the “over” rope that is already there. Mark these crossings with a circle.
The result is an Ashley tying diagram. To tie the knot with this diagram, pin it out on a cork board. Lay rope along the diagram. Whenever you meet a crossing marked with a circle, there should already be a rope there and you need to go under it. This is quite a pain.
Turk’s heads are cylindrical knots. Most Boy Scouts know how to tie small Turk’s Heads in the hand. Larger Turk’s heads are tied on a cylinder. Suppose one wishes to tie a Turk’s head with 8 bights. One finds 16 nails and a wood cylinder of appropriate size. One marks two rings on the cylinder and puts the nails on these rings in equally spaced intervals. One chooses an offset for the left to right and right to left movement. Starting at the left side at nail 0, you go to a right nail and then back to a left nail with the offsets one has chosen. To tie the Turk’s Head with a single line, one must return to nail #1, 3, 5, or 7 as these are relatively prime to 8. The offset on the right side is typically chosen to be close to half the total offset for left to right and back. The crossing diagram is trivial in that the rings on the cylinder alternate between left over rigth and right over left. So there is no need to deal with a tying diagram. In addition, one runs the cord freely from side to side and so there is no need to pin the cord.
The above cylindrical diagram for ABOK #2217 means that it possible to tie this beautiful knot using the Turk’s Head’s method.
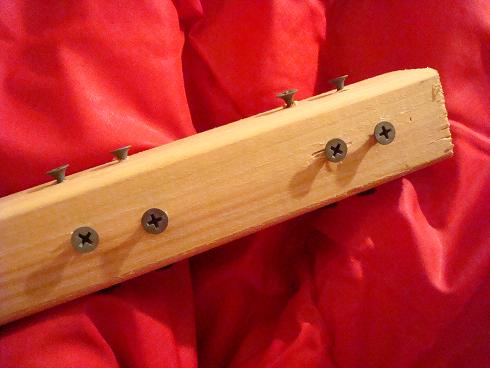
Materials: 50 feet of 5/32″ cord. 1 1/2″ diameter wood ball. 6 inches of wood 2×2. 16 screws or nails, 5/8″ long. 15 feet of thin wire or thread to be used as a guide. [Metric: 10 meters of 4mm cord. 40mm wood ball. 20cm of wood 5cmx5cm. 16 screws or nails, 15mm long. 5 meters of thin wire or thread to be used as a guide.]
No need to be exact, just get the nails or screws into the square wood piece approximately as follows:
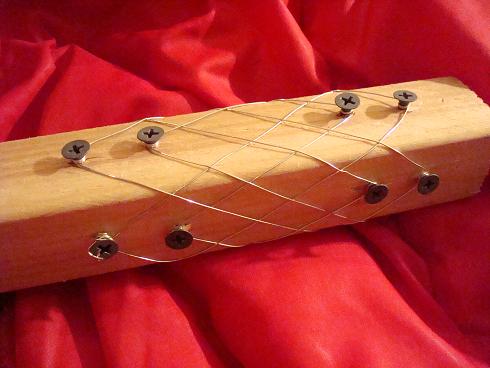
Next we tie the guide wire to the wood. We’re going to label the four rings of screws, from the left in the picture, “outer left”, “inner left”, “inner right”, and “outer right.” Tie one end of the guide to an outer left screw. We’re going to wind it diagonally around the wood, back and forth. The rule for winding is fairly simple, but it is different when you are going from left to right versus when you’re going from right to left.
Starting on the right, from an outer screw go two sides to an outer screw; And from an inner screw go one side to an inner screw. Starting on the left, from an outer screw go two sides to an inner screw; And from an inner screw go two sides to an outer screw:
OL -> OR + 2,
IL -> IR + 1,
IR -> OL + 2,
OR -> IL + 2.
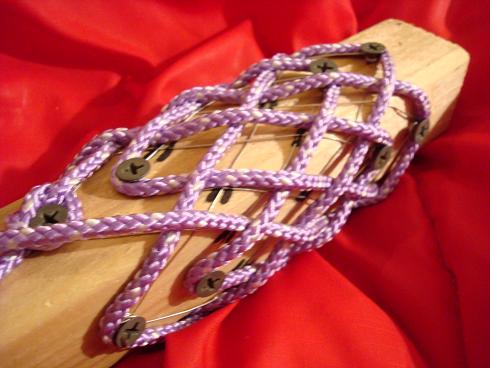
Eventually, after visiting all 16 screws, you should get back to where you started and your form will look something like this:
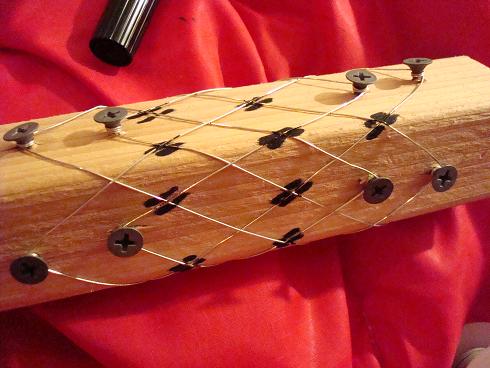
As with any Turk’s Head, different rings will be either left over right, or right over left. You need to mark this on the form. I used a black magic market to mark the places where left would go over right. (The unmarked crossings will have right over left.) The result looks something like this:
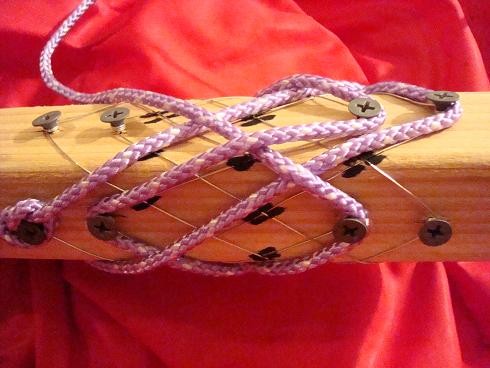
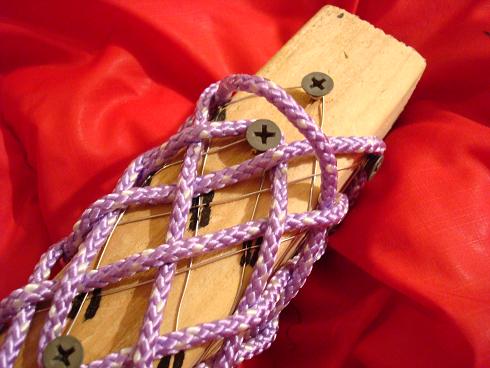
Now tie the cord to a screw on the left side of your wood. Wind the cord along the guide wire, bringing it under itself where needed to be compatible with the marked crossings. This doesn’t take very long at all. Early on your knot will look like this:
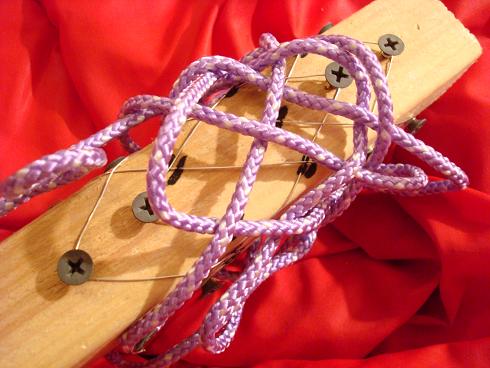
And eventually, following the guide wire and going over or under as needed, you return to where you started:
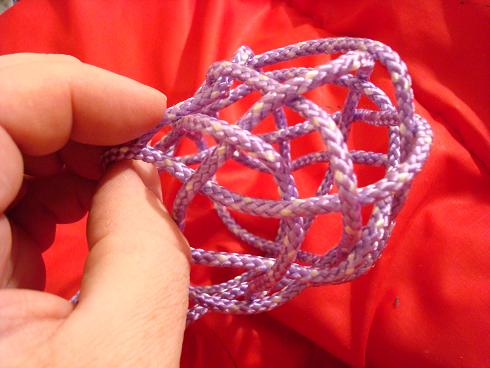
Lift a few bights off of the nails and remove the knot from the form:
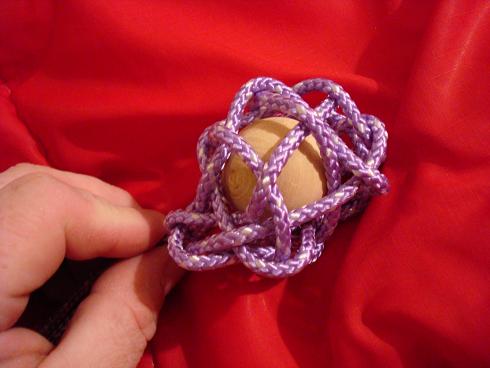
The knot is now done with 1-ply, but it is too loose to be pretty. So pull out some of the excess cord, bringing the knot to a more spherical shape:
Before you get it too small, put the wooden ball inside. Pull more cord out of the knot, leaving it loosely around the wood ball. Then tighten it up a little, but still leaving it pretty loose:
Now we double the knot. Note that the beginning and ending points of the knot are next to each other. That means you can lead the working end back into the knot, following alongside the other end. To do this you will have to go over and under where the other lead does this. After a few minutes your knot should progess like this:
In doing this, you may find it useful to have a large crochet needle.
When you get back to the origin, take one last extra dive so that the two ends of the rope come out separated by one crossing. This makes it look more symmetric (and is shown in the Ashley drawing as crossing number 41):

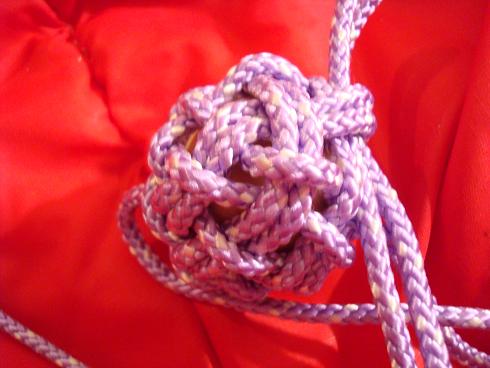
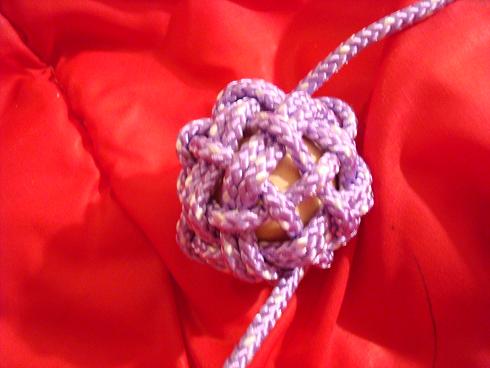
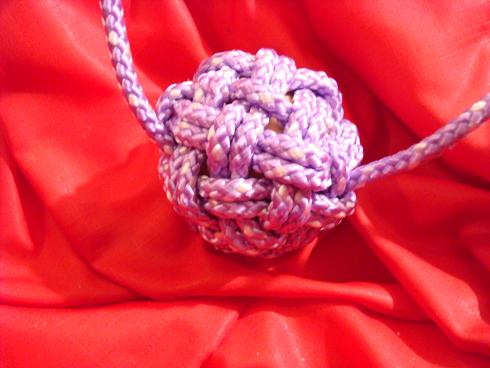
For the dimensions suggested, you should have enough room to add a 3rd ply. Our photos are for a smaller ball with room only for two plies. So add another ply according as you think appropriate.
Finally, it’s time to tighten up the knot. When you’re done, the knot should be quite hard as the rope will be pulled tight. To tighten up the knot, work out the excess line the same way you’ve done it before. Uh, did I forget to mention how this is done? Ok. You move a loop of excess cord through the knot starting at one end and working the loop through to the other end. By the time you get from one end to the other, you will have tightened up each individual part of the knot. Here’s a drawing showing a loop partway worked through the knot:
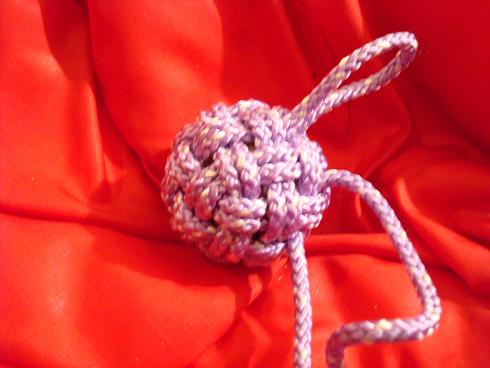
I suppose I should also mention that it is important to eliminate twists in the knot as you pull excess material through it by moving a loop. Twists could become kinks if you leave them in. And try to avoid tearing up the material while you’re doing this. The finished 2-ply knot:


Beautiful! Did you set up everything and take all those photos yourself?
Yeah, that’s my dirty red sleeping bag in the background. I’ve now tied three of these but I’ve given them all away. Now I have none and my fingers hurt too much to tie another.
They take about 90 minutes for a 3-ply, if you already have the form set up. It leaves my fingers hurting.
The above knot is built on a 4-sided piece of wood. A slightly smaller, but equally pretty knot arises if you make it 3-sided. And you could make it 5 or more sided. Such a knot would have a natural shape like the outer portion of a torus and would be suitable for covering a large Matthew Walker knot in the middle of a rope. The Matthew Walker knot can be one of the more mysterious knots as in the story told here.
that’s my dirty red sleeping bag
It doesn’t look dirty. Sheesh. You should see my sleeping bag. I can’t take it back to the dry cleaners ’cause last time I did (about 6 years ago) they complained about it spraying feathers all over the room (it has a lot of holes).
Kea! That’s too much information I’m sure. To fix the holes in your bag, get some fabric cement. Put a dot on each hole. With the right kind of cement, the feathers inside will form a little clot and will connect to the fabric. I do this when I get holes in my down coat because I can’t stand little feathers flying into the air every time I move around.
Also, we used to wash down bags in the big industrial washing machines rather than dry cleaning, and never had any problems. The feather problem, if any, would happen during drying, but you can dry such a bag outside. Of course that was in New Mexico where the air typically carries around 5% humidity (where 100% = fog).
I’ve tied the 4th knot based on the 2×2 and I’m getting faster; now about an hour for a 3-ply #2217 (original style, with 40 crossings). So far, it turns out that I can give these away slightly faster than my fingers can put up with tying them.
Most of the speed improvement is from an improved algorithm for tightening it up: I now put the plies in while it is still loose, which is much faster. I use a crochet hook to do this, and then I tighten it up in only one pass.
Also, I figured out an algorithm for making the approximate icosahedral symmetry covering knot also known as “the great white whale.” Topologically, the surface of a knot appears to be a collection of quadrilaterals. Swapping vertices for faces you get a collection of various sized polygons with 4 meeting at each vertex.
The above algorithm shows that the 4-vertices (which are places where 4 bights meet in the knot) are natural, they’re the flat points which is all that a standard Turk’s head possesses. And the above also includes 3-vertices so we know how to do them. To make an approximate icosahedral symmetry, I have to also have 5-vertices. And I want to implement them on the margin between regions of flat knot. I figured out how to do it but I can’t put pictures in comments…
I made this knot he old way, I like your idea but i get lost on the wiring ( the OL -> OR + 2 thing)
Starting on the left, from an outer screw go two sides to an inner screw; And from an inner screw go two sides to an outer screw:
(left outer or right outer?)
I’ll keep trying but for sake of clarity we could say
from side 1 left outer to side 3 left inner etc…
(just an idea)
That could be confusing. Here’s the complete instructions for the 2217:
Side 1 left outer
Side 3 right outer
Side 1 left inner
Side 2 right inner
Side 4 left outer
Side 2 right outer
Side 4 left inner
Side 1 right inner
Side 3 left outer
Side 1 right outer
Side 3 left inner
Side 4 right inner
Side 2 left outer
Side 4 right outer
Side 2 left inner
Side 3 right inner
and finally back to
Side 1 left outer
I gave the instructions that way so that they could also be used to tie the modification of the 2217 to have 3 bights. For that knot, the full instructions are:
Side 1 left outer
Side 3 right outer
Side 2 left inner
Side 3 right inner
Side 2 left outer
Side 1 right outer
Side 3 left inner
Side 1 right inner
Side 3 left outer
Side 2 right outer
Side 1 left inner
Side 2 right inner
and finally back to
Side 1 left outer
I really thank for your attention you are a true gentelman when i finish ( if Ill finish) ill send you a post
Mr. Brannen you are a G E N I U S thats all i can say (besides of thank you of course).
here are the results and some of my work
http://picasaweb.google.com/faromarino/ABOKKNOTS?authkey=3eZf-B2TPPY
since you gave away your knots I would gladly send you one just tell me where I can send it
Rich, your work is fantastic! I can see that I am out classed. I love how even you’ve put the knot together.
Don’t worry about sending me one (but thank you); I keep tying more as I find people I want to give one to. As you’ve discovered, they’re fairly fast to tie on a jig. I remember from my youth having to deal with pins and cork for a good bit of the evening to crank one of these out.
Not only you put me in the right track, now I start to wonder if I can do this with six sides and my head starts to burn and smoke out of my ears, maybe is possible or is a mathematical impossibility Ill let you know if this can be done (or not) when I dedicate some time to the matter.
Anyways THANKS Im happy man now.
almost a year later I got to make the six bights
following your instructions for the four bight
(with modifications of course)
it came out a not so spherical knot (more like barrel) but very pleasing though
Side 1 left outer
Side 4 right outer
Side 1 left inner
Side 3 right inner
Side 6 left outer
Side 3 right outer
Side 6 left inner
Side 2 right inner
Side 5 left outer
Side 2 right outer
Side 5 left inner
Side 1 right inner
Side 4 left outer
Side 1 right outer
Side 4 left inner
Side 6 right inner
Side 3 left outer
Side 6 right outer
Side 3 left inner
Side 5 right inner
Side 2 left outer
Side 5 right outer
Side 2 left inner
Side 4 right inner
back to Side 1 left outer
to see the end results at:
http://picasaweb.google.com/faromarino/ABOK22176Bight?authkey=Gv1sRgCKq1sfmSh8r-cg&feat=directlink
Beautiful!
According to my counting, the knot will complete in a single circuit with any number of bights that is not a multiple of 7. Mathematically, it’s just like a Turk’s head with 7 leads. So you might try 5.
Pingback: A Fantastic New Knotting Method « It’s Knot Art
ok starting to think on 5… I will keep you posted.
Mr. Brannen
this time I had a faster response for you
instructions to the ABOK2217 in 5 bights
Side 1 left outer
Side 4 right outer
Side 1 left inner
Side 3 right inner
Side 5 left outer
Side 3 right outer
Side 5 left inner
Side 2 right inner
Side 4 left outer
Side 2 right outer
Side 4 left inner
Side 1 right inner
Side 3 left outer
Side 1 right outer
Side 3 left inner
Side 5 right inner
Side 2 left outer
Side 5 right outer
Side 2 left inner
Side 4 right inner
back to Side 1 left outer
to see the end results at:
http://picasaweb.google.com/faromarino/ABOK22176Bight?authkey=Gv1sRgCKq1sfmSh8r-cg&feat=directlink
As is usual for your stuff, it is beautiful. I think 5 is a reasonable tradeoff.
Mr. Brannen
with this one I should get my degree
I started this knot out of curiosity about the multiple of seven theory to find out physically why not could be done but went about with no problems.
The instructions to tie the modification of the 2217 to have 7 bights. For that knot, the full instructions are:
Side 1 left outer
Side 4 right outer
Side 1 left inner
Side 3 right inner
Side 7 left outer
Side 3 right outer
Side 7 left inner
Side 2 right inner
Side 6 left outer
Side 2 right outer
Side 6 left inner
Side 1 right inner
Side 5 left outer
Side 1 right outer
Side 5 left inner
Side 7 right inner
Side 4 left outer
Side 7 right outer
Side 4 left inner
Side 6 right inner
Side 2 left outer
Side 6 right outer
Side 2 left inner
Side 4 right inner
back to Side 1 left outer
edn results same link as above
incrivel trabalho!
Hello,
I’m blowing smoke out of my ears at the moment. I’m trying to tie this and the expanded inscructions were VERY helpful. I have used a piece of PVC pipe and created an apx version of what you had in your diagram. I have follow the inscructions and put in a rope to act as a guide. I’m stuck on the over/under part. Is there a method to tell which intersections go over and which go under? I got the impression that if following the rope on the form then every other one would be an under. I doubt I have to tell you that this doesn’t work. Any help?
If you hold the cylinder in your hand there are two kinds of crossings: ones where the rope running from the bottom left to the top right (we’ll call it the “right” rope) is on top, and the opposite.
All the crossings aligned exactly on the same ring around the cylinder are the same type. And adjacent rings are the opposite types. I used a black magic marker to mark all the crossings of the “right on top” sort. See the 3rd photo from the top.
This will allow you to figure out whether you’re supposed to go over or under. I.e. if it’s an odd ring, the left rope is on top, otherwise the right rope is on top. Note that the rope you’re running will be a “right” rope until it reaches the edge and then it will become a “left” rope.
Another way of looking at it is to realize that the “over under” applies to the ropes that aren’t already included.
And my problem is to find a new way to untie and old knot 😉
can you please make a tutorial on this? http://www.kumeko.com/products/knotty
I love this, been working on it for hours, but cannot get the cord off once I have it all wrapped up. Might move to a pvc pipe and small threaded rods.
Hello, is it possible to draw the trajectory of the rope on the surface of a sphere as a parametric function in 3D? Something like point{x,y,z}={f1(p),f2(p),f3(p)}, where p is a parameter. Or how would you render the knot in 3D on PC?